Saturday 30 November 2013

Lemon-Scented Pull Apart Bread

Welcome to the third post of Tarts and Stuff, posted by Nat because Nic is busy shopping in Bangkok~ It's only been 5 days since we posted, but it feels like ages ago! Just wanted to thank everyone once again for the tremendous support and encouragement we have received so far. It's definitely really heartwarming and you have no idea how much Nic and I spazzed over these few days. Haha.

Anyway, back to business cause it's all about bread today. :)


Firstly, I have to apologise for the bad pictures because baking this took AGES and I was dead tired from standing in the kitchen all day, 5 hours to be exact. Also, I had to juggle with baking this and making dinner, and that was no easy task! This recipe was a success though, despite the numerous hiccups along the way, like having to add more flour than called for, having fat doughy fingers, and let's not forget; having my kitchen look as if it was hit by a tornado. (The clean up was the WORST and I wanted to take a picture of the mess I made, but that would be kinda embarrassing.)


There is, however, one unsolvable problem that remains with baking bread, and it's that fresh bread goes stale INSANELY fast. Literally within a day. BUT, good news is, when I ate it today, I realised the flavors seemed to be more pronounced than on the first day! So yeah... Soft bread or tastier bread. You can only choose one because life's like that. *Rolls eyes* Also, it suddenly hit me that this bread might be ideal for making french toast when it's stale. Not proven though, so I really don't know. Haha.


I think my favourite part of the bread was the exterior because it remained nice and crusty. Plus, I really liked the cream cheese glaze! In an attempt to be more descriptive, I'd say it added a nice contrast of flavors compared to the bread itself which was slightly less sweet! Also, I must admit that that was very awkward to write, but A for awkward effort? 


And we are coming to the end of the post! (Say nooooo) Fun fact: If you noticed, the previous pictures have a sugary topping unlike the first one. If you're wondering why, it's because I decided that it made the bread look more ~photogenic~, and also provided a nice crunch! :D

SO YEAH, do give this recipe a try because it was insanely fun to make, albeit pretty tedious and messy. Still, if you like playing with dough and don't mind being covered with flour, I'd say give it a try! It's worth it. :)

Here's the link to the recipe! And if anyone wants to know, I added about 6 tablespoons more flour than called for, because Singapore is just that humid and it interfered with the dough. :( Oh and, I recommend reading the full recipe and the comments before proceeding! It'd help a lot. :)

Have fun and thanks for reading!

See you soon!

Nat

P.S. I know this post is a tad disorganised, but I'm learning! Hope it's still understandable and I promise I'll get better soon!


Monday 25 November 2013

Japanese Sweet Potato Pie/Tart

How exciting to be posting for the FIRST time ever on Tarts And Stuff :D Nicolette and I have been talking about creating a food blog for months and we've finally done it! A lot of effort was put into it so I hope you guys will support us~

Speaking of first times, I've never baked a Sweet Potato Pie until now! In fact, the first Sweet Potato Pie I'm tasting is the first Sweet Potato Pie I'm baking. Thanks to beginner's luck, the pie turned out pretty good! :) Though there were some mishaps along the way, but I guess that's hard to avoid. Haha. *Self consolation*

Now on to the pie/tart itself! I don't know how a Sweet Potato Pie is supposed to taste like, but I'd say this tastes good to me! :) The crust added a nice crunch to the custard filling which was really creamy and all sweet-potato-like (no other way I can say this). I'd still like to try the authentic version some day though!


However, the next time I make this, I'll definitely use another pie crust recipe (though you can still give this crust a try, it's quite good). Although it was sweet, buttery, crumbly and really easy, it stuck to the foil when I was blind baking! So I guess it turned out not so much rustic, but ugly. Haha. Also, I highly suggest using a pie plate cause mine is a tart pan, so the end result was more of a tart and less of a pie, which explains why I'm using these 2 words interchangeably here. (The baking world is so confusing sometimes, I hardly ever get it.)

Trying to act all professional here! I hear you scoffing but hey, all I have for a camera is the iPhone 4. :( I tried!! I must say the sweet potatoes look better than the tart itself but... It just doesn't taste as good, no no. ;D (Brown is beautiful right?)


Nutmeg makes anything better. (Although I was lazy to grate any on the pie here) I liked this shot the best! Still much room for improvement, though! But hopefully Nic and I will learn more along the way and get better with every post.

Now on to the recipe, courtesy of Leite's Culinaria (aka my favourite website ever) ~

Japanese Sweet Potato Pie (Adapted from Cheryl Day and Griffith Day)

Ingredients:
  • 1 1/2 pounds (680g) Japanese Sweet Potatoes
  • 1 cup heavy whipping cream
  • 3 large eggs, lightly beaten
  • 2 tablespoons molasses
  • 1/4 cup granulated sugar
  • 1/4 cup packed light brown sugar
  • 1 tablespoon unbleached all-purpose flour
  • 1/4 teaspoon ground cardamom
  • 1/4 teaspoon ground cloves
  • 1/4 teaspoon ground cinammon
  • 1/2 teaspoon ground ginger
  • 1/4 teaspoon sea salt
  • 1 recipe Shortcut Pie Crust (made with brown sugar and prebaked in a 9-inch deep-dish pie plate)
  • Whipped cream (optional)
  • Freshly grated nutmeg (optional)
Directions:
  1. Steam the sweet potatoes until fork tender, about 35-45 minutes.
  2. Using a food processor*, combine the cream, eggs and molasses with the sweet potatoes puree until smooth.
  3. In a large mixing bowl, whisk the flour, sugar, spices and salt. Add the sweet potato mixture and stir until smooth.
  4. Pour the filling into a pre-baked pie crust and bake the pie for 60-70* minutes, until the filling is firm around the edges but still jiggles slightly in the center when you gently shake the pie plate.The filling will continue to firm up as it cools. You may need to loosely cover the pie with foil after 50 minutes to prevent it from overbrowning. Let the pie cool completely before slicing and serving. 
  5. The pie is best served the same day, but can be covered with plastic wrap and refrigerated for up to 3 days. If desired, heap the whipped cream on top and sprinkle with nutmeg. 
*If you do not have a food processor (which I used because I was lazy), please check out the instructions on the original post!

That's it for now! I hope you've enjoyed reading our posts and please look forward to more! We would also appreciate comments and constructive criticisms from everyone! :) Haha yeah, and if you're cool (you know you are), please say hi too! Just to let us know that people are reading (hopefully) ~~

See you again soon!

Nat

Chocolate Chip Cookies

Hiya!! You have no idea how excited I am typing this first post ever.
So I've decided to kick things off with something really classic, something practically everyone loves to eat - good old chocolate chip cookies. (and because a few people asked me to make some for them)
It's a pretty straightforward recipe but I guess it comes down to finding that one recipe that floats your boat. Personally, I'd take crunchy cookies over soft ones any day. These ones are pretty much crispy, but the inside is still moist and it has those gooey chocolate chips everyone loves, so here goes!!
Oh yes, click here for the recipe, aptly named 'Best Chocolate Chip Cookies'.
Basically you'd need flour, sugar (white & brown), butter (softened), baking soda, bit of water, vanilla extract, salt, eggs and chocolate chips! Of course you can add nuts and dried fruits if you'd like.
I think it's quite appalling that I still do not own an electric mixer so when I had to cream the white sugar, brown sugar and butter together, it was BY HAND. It was physically straining :(
 Hershey's semi-sweet chocolate chips /oh the joy/
 Before..... (this is where ice-cream scoops come in handy)
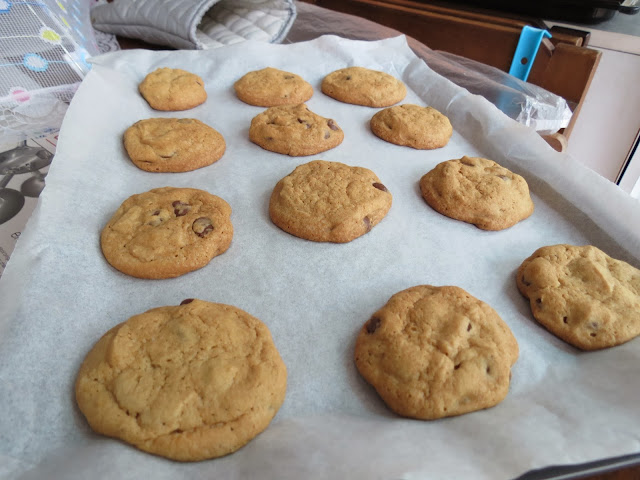
 ....and after! The recipe said 10 minutes at 175 degrees Celsius, but it really depends on your oven so just bake them till they're brown enough. My times varied between 10 to 15 minutes, 12 on average.
 That top cookie's smiling at you :-)
Absolutely delicious hehe so yup please go ahead and try it!! It's very simple!
Since this is only the first post, we're still getting used to the layout of the posts and all, so please tell us how you'd like us to format our posts, like what details we should include or leave out :-) and feel free to ask us any questions! This is only the beginning my friends. See ya!

Nic x